Monday 26 October 2015

EXCLUSIVE ACCESS COULD NOT BE OBTAINED BECAUSE THE DATABASE IS IN USE


To read my blog post click [Here]


Regards
Ganapathi varma
Senior SQL Engineer, MCP
For more updates:
Subscribe for Blog posts [Click Here]
Follow FB Page [Click Here]
Follow FB Group [Click Here]
For Suggestion & Feedback mail us at gana20m@gmail.com

Friday 23 October 2015

Steps to hide SQL Database from Users

The SQL Server Alliance is becoming more popular in these days as a result various departments or client of the company would access same SQL Server Instance. When they worked in a combined instance, they do not want to make their database visible to other users. In this blog post we will discuss how to hide the database from users using Transact-SQL or using SQL Server Management Studio.

Using T-SQL

For this first we have to create two databases by using the following T-SQL query

Create database [Example_1]
go
Create database [Example_2]
Go

Create logins for both newly created databases

create login [Example_1Login] with
password='pa$$w0rd@123'
go
create login [Example_2Login] with
password='pa$$w0rd@123'
go

Use the following T-SQL script to hide all users database from all logins. The database then only visible to sysadmin and database owners

revoke view any database to [Example_1Login]
go
Revoke view any database to [Example_2Login]
go

As we know that only sysadmin and owners of the database can see database. So run the below statement to select Example_1Login as an owner of Example_1 and Example_2Login as an owner of Example_2

use [Example_1]
go
sp_changedbowner 'Example_1Login'
go
use [Example_2]
go
sp_changedbowner 'Example_2Login'
go

Using SQL Server Management Studio

Right click on the root section (Server Name) of SQL Server Management Studio >>Click on Properties

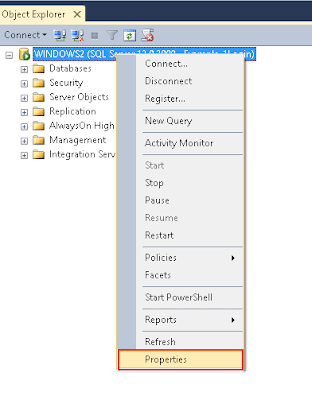
Under select page column, select Permission >> Click on the account, and select deny to view the database

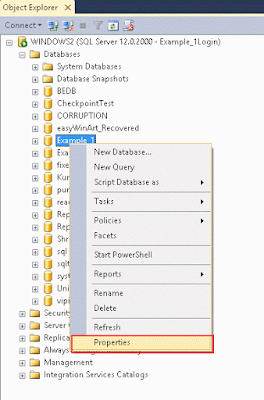
In the next step, right click on the newly created database >>Click on Properties

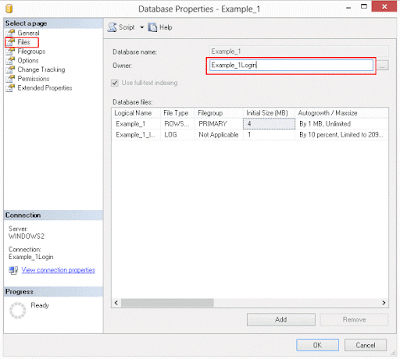
Select Files >>Change the owner to newly created account

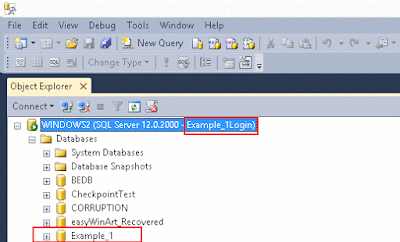
Now Example_1Login can see only Example_1 database and Example_2Login can see only Example_2 database

Conclusion

There are limited options to hide your database, as we discussed above. Once your database login gets restricted with DENY VIEW to PUBLIC then only the owner of the database and sysadmin can see the database

Thursday 22 October 2015

How To Generate Cluster Log In SQL Server

What is SQL Server Cluster log? How can it be generated? Many of the users are unaware of it. Here, let us have a discussion regarding it. In this informative page you will come to know about cluster logs in SQL Server and how it is been created. The session starts with a small introduction to Cluster Log.

Cluster Log

Cluster log stores the entire information of the cluster that includes SQL nodes, storage details as well as management. Apart from these, it also contains information about statistics, startup, errors etc. So, it is clear that information contained in this file is more important and these log files are situated in the data directory of the Server.
While troubleshooting the problems occurred in the cluster, data in the cluster.log file is important. To know about the problems in cluster, it is better to check out the details by creating a cluster log file. Then, the query that arises will be how to create cluster.log file.

Steps To Generate Cluster Log Files

One point to be noted while generating the cluster log file is that, the command for creating the log file is different since it depends on the operating systems. When you check out on different servers, you will get to know that, in Server 2003 the log files were generated automatically. However, from the later versions it has to be created separately. It is created with the help or support of cluster.exe command.
  • From the nodes of cluster, open Command Prompt. Right click it and Run As Administrator.
  • Type the command cluster log/g, where ‘g’ stands for ‘Generate’.
  • cluster.log file will get generated and you can see it in C:\Windows\Cluster\Report
One of the advantage of cluster log method is, users can specify the level in the generated file by /level option. The adverse effect is that, cannot mention the destination directory for the files. Another way to generate is to use PowerShell, command is; Get-ClusterLog. In this methods the merits and demerits is just the opposite of the previously mentioned method. In this PowerShell method, users cannot mention the level but, can create log file from all the nodes and store in one directory.
Let us see some other commands related to the generation of cluster.log files.
/Copy:< directory >
This command is used for copying the logs generated to single destination. This makes collection of logs much easier. Suppose, if you want to save the files at c:\archive\logs then, you need to type command as, c:\archive and then only you can execute the command ‘cluster log /g /copy:logs’.
/Span:< minutes >
It is to mention the minutes to go back for log collection. If you do not use this, you will get the history of several days. This helps to limit the contents of log and only includes the last few.
/Node:< node name >
It enables the stipulation of specific node. When this is done, logs for other nodes will not be created. If the option is not mentioned, all the nodes in cluster will have cluster.log file.
/Level:<0-5>
This is used to change the logging level and in Server 2008, the default level is 3. If the level is changed, more information will get logged, but there will be some effect on the performance of the system. If it is less than 3, less information will be present. Though in Server 2008, you can set the level from 0 to 10, the maximum is 5.
If you have come across with the situation to generate cluster.log files, hope this session will be helpful.


For more updates:
Subscribe for Blog posts [Click Here]
Follow FB Page [Click Here]
Follow FB Group [Click Here]
For Suggestion & Feedback mail us at gana20m@gmail.com